
When you decide to pour concrete, it's vital to approach the task with a clear plan and the right materials. You'll need to gather everything from the concrete mix to the tools that'll help you achieve a smooth finish. Preparing the site correctly can make all the difference, so don't overlook this step. Once you've got your materials and site ready, mixing the concrete to the right consistency is important. But that's just the beginning; the real challenge lies in how you pour and finish it. Let's explore what comes next.
Gather Your Materials
Before you begin pouring concrete, you'll want to confirm you have all the necessary materials at hand.
Start by creating a tools checklist to make sure you don't miss anything vital. You'll need a mixer, a shovel, a trowel, and a level, among other tools. Having everything ready will streamline the process and help you avoid interruptions.
Next, gather your concrete mix, water, and any additives you plan to use. Check the manufacturer's instructions for the right proportions, as this can greatly affect the strength and durability of your pour.
Don't forget to have a wheelbarrow handy for transporting the mix to your pouring site.
Safety precautions are essential during this process. Make sure you have protective gear, such as gloves, safety goggles, and a mask, to safeguard against dust and potential splashes.
Lay down tarps or plastic sheets to protect the surrounding area from spills.
Prepare the Site
With your materials ready, the next step is to prepare the site for pouring concrete. Start with a thorough site assessment to guarantee it's suitable for your project. Look for any existing structures, vegetation, or debris that might interfere with your work. Clear the area by removing obstacles, and consider the drainage to prevent future issues.
Next, conduct soil testing. This step is essential because the type of soil affects the strength and stability of your concrete. If you find loose or sandy soil, you might need to compact it or add a gravel base for better support. Make sure the area is level, as uneven ground can lead to cracking.
Once you've completed the assessment and testing, outline the area where you'll pour the concrete. Use stakes and string to create a clear boundary.
Mix the Concrete
Mixing concrete is an important step that directly impacts the quality of your project. To achieve the best results, you need to focus on effective mixing techniques and guarantee the right concrete consistency.
Start by gathering your materials: cement, sand, gravel, and water. The right ratio is vital—typically, a mix of 1 part cement, 2 parts sand, and 3 parts gravel works well, but adjust as necessary based on your specific project requirements.
Once you have your materials, you can use a concrete mixer or a wheelbarrow and shovel. If you're using a mixer, add the dry ingredients first, then gradually pour in the water, mixing until you achieve a uniform texture.
If you're mixing by hand, combine the dry ingredients thoroughly before adding water incrementally, making sure you mix well to avoid dry spots.
Keep an eye on the concrete consistency; it should be workable but not too runny. If it's too thick, add a bit more water.
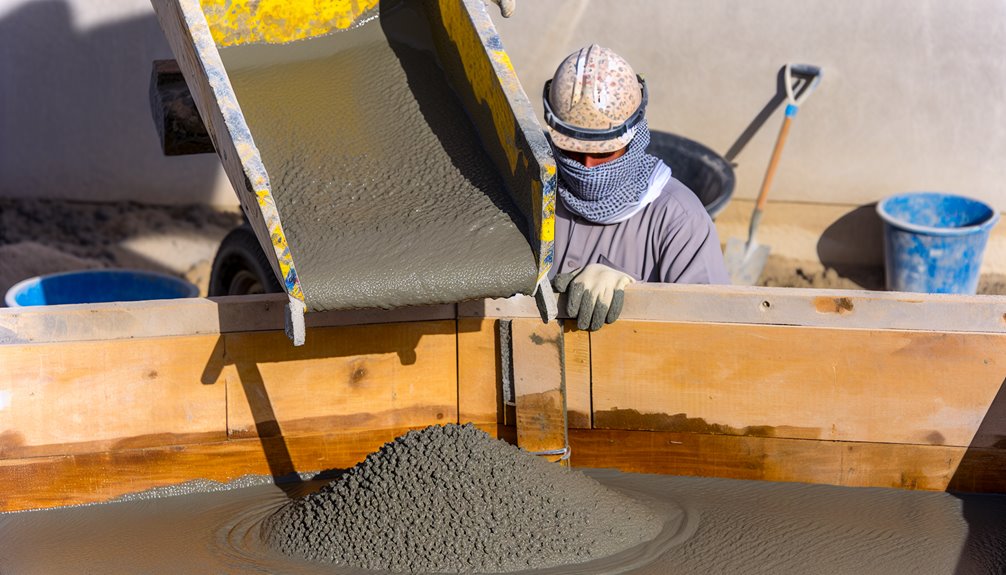
Pour the Concrete
Now that you've mixed the concrete to the right consistency, it's time to pour it into your prepared forms.
Begin by positioning yourself at one end of the form, guaranteeing you have a clear path to pour. Use proper concrete pouring techniques to minimize air pockets and guarantee an even distribution. Tilt the wheelbarrow or pour directly from the mixer, keeping the flow steady.
As you pour, focus on filling corners and edges first. This prevents gaps and guarantees a solid foundation.
Avoid common mistakes, like pouring too quickly, which can lead to splashing and uneven surfaces. Instead, maintain a consistent pace, allowing the concrete to flow smoothly into the form.
If you're working with a large area, consider using a concrete rake to help spread the mix evenly. Keep an eye on the level as you go; you want to avoid overfilling or underfilling any sections.
Remember to keep your tools clean to avoid contamination. Once you've poured the concrete, you'll be ready to move on to the finishing process, but first, make sure you've done a thorough job in this essential pouring step.
Finish the Surface
Finishing the surface of your freshly poured concrete is essential for achieving a smooth and durable finish. Once you've poured the concrete and it's set slightly, you can start using various finishing techniques to enhance the surface texture.
Begin by using a bull float to level the surface, working from the center outwards. This helps to eliminate any imperfections and brings a bit of the aggregate to the top.
As the concrete starts to firm up, you'll want to use a hand float for more detailed work. This tool allows you to refine the surface further, guaranteeing an even and consistent texture.
If you're aiming for a specific finish, such as a broom finish, you can lightly drag a broom across the surface once it's set enough to hold the texture.
Don't forget about the edges! Use an edging tool to create a finished edge around the perimeter, preventing chipping and enhancing the overall look.
Frequently Asked Questions
How Do I Choose the Right Concrete Mix for My Project?
To choose the right concrete mix for your project, consider mix types like standard, high-strength, or decorative. Keep strength considerations in mind based on load requirements and environmental factors to guarantee durability and performance.
What Are the Best Weather Conditions for Pouring Concrete?
The best weather conditions for pouring concrete are mild temperatures and moderate humidity levels. Ideally, you should pour when temperatures are between 50°F and 85°F, avoiding extremes that can negatively affect the mix's integrity.
How Can I Prevent Cracking in My Concrete?
To prevent cracking in your concrete, use concrete reinforcement techniques like rebar or wire mesh. Also, implement temperature control methods, ensuring it cures slowly, especially in extreme weather, to maintain its integrity and strength.
What Tools Are Essential for Pouring Concrete?
To pour concrete effectively, you'll need a mixer, trowels, a float, and a level. Guarantee proper mixing techniques and regular tool maintenance to achieve the best results while preventing any issues during the pouring process.
How Long Does It Take for Concrete to Cure Completely?
Concrete typically takes about 28 days to cure completely, depending on factors like temperature and humidity. Using proper curing methods, like keeping it moist, can help guarantee maximum strength and durability during this cure time.
Conclusion
By following these steps, you can successfully pour concrete that's both durable and visually appealing. Remember to gather all your materials first, prep the site thoroughly, mix the concrete well, and pour it evenly. Don't forget to finish the surface with the right tools for that perfect texture. With careful attention to detail and a bit of patience, you'll achieve great results that stand the test of time. Now, get out there and start pouring!